Caring for garden tools
Caring for garden hand tools:
Garden tools are expensive investments, and unless you have received yours by way of family heirloom hand downs, garage sales, and so on. Regardless if inexpensive or not, we need to care for these frequently to maintain their integrity. Sometimes we use these for purposes they are not designed to withstand.
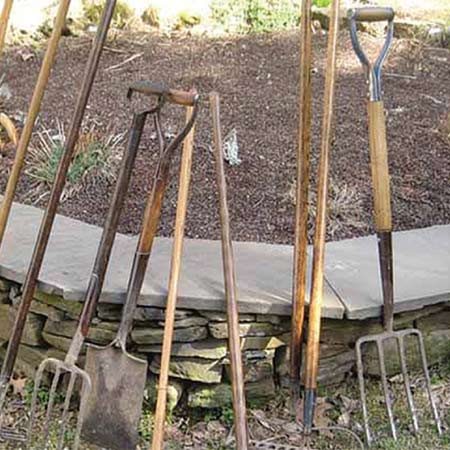
Wooden handles break, fracture, or if left out in weather uncovered can become splintered, cracked and dried out. One time I broke a really nice rake trying to “jimmy” up a metal stake instead of using a Stake Puller.
http://stakepuller.com/
http://www.homedepot.com/webapp/wcs/stores/servlet/ProductDisplay?storeId=10051&productId=202332199&langId=-1&catalogId=10053&ci_sku=202332199&ci_kw={keyword}&cm_mmc=shopping-_-googleads-_-pla-_-202332199&ci_gpa=pla&locStoreNum=1236
In the same spirit, you wouldn’t want to use a shovel to do the work of a wrecking bar. So it is wise to know what your tools are designed to do and use them for their purpose.
Many people do not know what their tools are designed to do. You may want to try out someone else’s lawn and garden tools by helping them in their gardens, before deciding which tools you want to buy. A common mistake we all make is to buy tools on sale that look nice and then realize after the fact that they are not what we need. Generally, we all have a few favorite tools that we use all of the time. So it is wise and economical to study and then try out before buying. http://pnwmg.org/mgtools.html (a beginning primer on some common garden tools).
Today we have low maintainace graphite, hard rubber/plastic, etc., tools to choose from. Not all tools are good long wearing tools. Quality is worth the extra bucks.
Metal parts can become dull, rusted, pitted, worn out, or broken. Fertilizers and other chemicals can errode the metal.
Maintaining our tools is the best prevention against needing to replace parts or whole tools.
Although these are not in the worst of shape, some tools were put away dirty. As well this rack of 2x4’s and nails is working, however there are better ways to hang and organize tools so they do not have to have holes drilled (which can cause splitting in the long run).

Maintainance
Lots of ideas prevail for caring for metal and wooden parts. I will list some of these and you can make your choice:
Rust Prevention and Metal Care:
Rinse your shovel blades, rake and hoe heads etc, with water after using, to remove dirt. Dry all metal parts with rags to prevent rust.
Use a cloth covered pointed object to remove caked on dirt around bolts and screws (like a screwdriver).
Remember to wipe down tools with alcohol/chlorhexidine, soap and water to reduce spread of plant diseases.
To prevent rust, clean your garden tools thoroughly after every use and coat them lightly with lightweight oil such as WD-40 (which also helps to remove rusty screws) or mineral oil.
If resin from pruning conifers is difficult to remove, you may want to try Liquid Wrench, brake fluid or lighter fluid. It works best to pour a little of these solvents on a cloth and wipe rather than to pour directly on the metal parts. Remember to store and discard rags, which can ignite/combust in proper ways.
Solvent saturated rags tossed into garbage bins or stored often combust and cause serious life threatening injuries and loss of property and life.
Tar is easily removed by freezing (then it will peel off) or by using a fine steel wool pad dipped in kerosene (will come right off and then wash with soap and water).
Metal and wooden handles on small tools can be dipped a couple of times in rubber (comes in colors), which is available in hardwares and in home improvement centers. This is also a good way to make tools more visible to those who have vision challenges. Teenagers and children love to personalize their garden tools with color.
Another covering to protect and to cover a small metal tool handle is to use sports tape, like used on hockey sticks etc..
Store tools off the ground. If you set a metal edged tool on a ground surface, cement garage floor etc., it will pick up moisture.
A pail of sand and oil dispersed through out makes a fast coating mechanism for shovels, hoes, etc., when you do this frequently and with a lot of tools. This coats the oil evenly.
Sharpen your cutting tools as well as the blades of shovels and spades during the gardening season. A hone or whetstone should be used for sharpening cutting tools. A file should be used to remove nicks and smooth the edge of your shovels and trowels.
Sometimes you will need steel wool/heavy sand paper and solvent to remove the rust or even out the pitting. Several good rust removers are available in hardwares. http://www.theruststore.com/Garden-Tool-Maintenance-W37C2.aspx
Wooden Handles:
Rub handles a couple of times a year with penetrating oil like boiled linseed, tung
etc..
I use this rub, made of turpentine, boiled linseed and beeswax…it is great and easy to make…but follow the directions exactly and be careful…
http://planetwhizbang.blogspot.com/2009/05/make-your-own-planet-whizbang-handle.html
if splinters happen, sand down with fine grain sand paper like 100 grit then use penetrating oil
If large cracks happen, inject with hard glue or other carpenters compund and then sand and use penetrating oil
Be sure that wood is entirely dry before coating
Coat once until wet and then let dry about 24 hours and then coat again
Storing Garden Hand Tools:
Store tools in an enclosed or covered area to prevent weather damage.
Store tools in a contained way so they don’t get stepped on (safety for pets, livestock, us, as well) and broken.
Locate and organize tools so they are easy to access. If you layer tools on racks you will have to dig through tools to get what you want.
(From “The Rust Store” see above.)

Store tools so they do not fall on someone and hurt or kill them. Always hang a rake, fork and hoe, etc., with sharp ends away from you (towards the wall).
Monkey Bars are some of the best garden/lawn tool organizers on the market today. However, these are very expensive and are not flexible as to length.
http://www.youtube.com/watch?v=4HQoxScG9rE
A good DIY tool organizer can be made froom scrap wood. A better oraganizer, which will never rot, is to heat 4 inch PVC pipe with a heat gun or over hot flame and then when malleable, insert an oiled 4x4 or 2x6, etc.. anything with an edge to stretch the heated PVC pipe into a rectangle or square edged PVC pipe.
The flat surface of the pipe will now sit nicely against a garage wall.
You will decide how long and how many rows of this you need in your covered space. Several small sections look nice as well as does one long section.
Then you drill a couple of holes on each end or along the middle and both ends to connect the pipe to the wall. You can also make the holes using anything pointed when the pipe is hot…it will go through like butter…so its your choice.
I liike to make the hole next to the wall just large enough for a screw with a washer and then the hole through the outer wall of the pipe a little larger so that later on, I can take a long necked screwdriver and fit it through the hole to unscrew the rack, should I desire to move it.
I use to screws iin line on the ends. SO you are screwing in just one side of the pipe and not through both walls surrounding the hollow space.
Then measure the spacing you desire for your tools. You will be using pieces of scrap PVC ¾ “ pipe…the same as you would use for garden irrigation lines. Then cut small 5-6” scrap pieces of ¾ inch PVC pipe (or any size you choose) with one end at a 50 degree angle and one end flat. So if you have a 10” scrap piece, just cut a 50 degree angle cut in the center and you will have 2 pieces, enough to hang one tool. Use a hack saw with a fine tooth blade and use a grinder or close tooth file to smooth out the cut edging.
You will then heat a hot plate, heat any metal flat surface, utility use crockpot on high, there are many choices for this, and lay the angled flat edge piece on this surface until near melt point. See the following you tube clip: http://www.youtube.com/watch?v=XfE9F4BP_XA
This shows how to tell when the plastic is hot enough to join to the side of the pipe (You can of course connect the plastic peg pieces to rounded hollow pipe as well…it looks nicer and is more stable when you flatten the pipe).
There will be a little residual plastic around the seams. This is a good thing. You can then use a soldering iron carefully or any long metal pointed object, heat it pretty hot and then smooth out the rough residual areas to help make the seam even stronger.
Let this cool on its own or use cold water sprayed or dipped to cool this down. It doesn’t take very long. As soon as it is cool, you are ready to hang it on the wall, unless you want to sprap paint it with a plastic surface spray paint (Krylon Fusion Paint for plastics works great). I have a friend who decoupaged her PVC pipe racks and then coated several coats of heavy duty outdoor marine varnish. I don’t recommend this though as it wears off and has to be recoated, which is what she does once a season. (Hers does look beyond fabulous though….she also decopauges her wooden tool handles and recoats them once a year. They do seem to be holding up fine.)
You may also want to drill or poke through when heated, a couple of holes on the cottom part of the rack so you can thread through some elastic heavy cording, etc., to make loops to hold hammers and such.
You may make caps of you do not like the open pipes and I did this for both the small round pegs and for the square/rectangular wall mount section. See below
When you need to clean these, it is a snap to just hose them down J.
There are so many things you can do with this type of plastic PVC rack, for example, make a couple of PVC small peg sections along with the tool pegs to hold reusable plastic garden markers. My best garden markers, which distinguish between different greens for example, are those that are heavy duty and made from cutting open the plastic pipe and flattening on a flat metal surface and then cut into marker shape, which can be inserted into the ground near the plants. I write on these with a Sharpey Pen. This way I can make them larger. The small white labels that are currently on market for reuse are nice, but I want to put more information on these markers so I want them to be larger.
It is well to learn to use PVC in and around the garden.
You should download and save this video clip, which will show you how to do everything I have just talked about.
http://www.youtube.com/watch?v=XfE9F4BP_XA
As well there is an 1.5 hour video workshop available for a small fee, which is worth every penny, that will show you all the skills you need to become proficient in making PVC pipe threaded connections, joints, couplings, insertions and so on.
I highly recommend getting this right now at : www.HowWeDoStuff.com
These folks will be interviewed on Dr Prepper show soon. They were interviewed once before for another preparedness topic.
Some other resource materials for download:
http://www.youtube.com/watch?v=5IqSvZr4Yz8&feature=related http://www.youtube.com/watch?NR=1&v=udwzhRM5r8k
http://www.youtube.com/watch?v=E2B9_37Nk4A
http://web.extension.illinois.edu/cfiv/homeowners/021116.html
http://www.extension.iastate.edu/newsrel/2004/nov04/nov0423.html
http://lancaster.unl.edu/hort/articles/2002/GardenTools.shtml
garden tools for littles
http://theschoolvegetablepatch.schools.officelive.com/chtools.aspx
Monkey Bars Garden Storage Racks
http://www.youtube.com/watch?v=4HQoxScG9rE
DIY 55 gallon drum storage bin
http://www.youtube.com/watch?NR=1&v=m8xGdP0ZGbo
· Hammer
· Wood file
· Galvanized wood screws
· Sharp knife
· Penetrating oil or kerosene
· Steel wool, emery paper, or a wire brush
· Epoxy adhesive
· Mallet
Garden Tool Repair
© The Fix-it Club. All rights reserved.
What Are the Steps to Fixing It?
Caution!
Don't try to repair a broken tool handle because a repaired handle will be weak. Replace the handle instead.
|
Insert the new handle into the hasp. |

Replace a tool handle:
1. Clamp the tool blade in a bench vise.
2. Remove the handle from the hasp using a drill, hammer, or other tools as needed.
3. Insert the new handle into the hasp.
4. Tighten the handle in the hasp using fasteners.
Fix-It Tip
To make finding the right hose parts easier, take the bad piece of hose to the hardware store with you to find the correct hose couplings. Most repair fittings work with either rubber or vinyl hoses, but some work only with one type.
|
Use a screw and screwdriver to firmly attach the handle to the tool head. |

Fix a leaky hose:
1. Cut through the hose on either side of the bad section using a sharp knife.
2. Attach male and female hose couplings to the cut ends, following the directions that come with the couplings. If the new hose fittings don't slide in easily, try softening the ends of the hose in hot water or lubricating them with soap or cooking oil.
Sharpen a garden tool:
1. If possible, remove the cutting edge from the handle.
2. Place the tool head in a bench vice or otherwise secure it against movement.
3. Use a file to sharpen the edge, following the original bevel. Remove any burrs or rough spots.
Remove rust from a tool:
1. Place the tool in a bench vise with the blade pointing down.
2. Coat the blade with kerosene or penetrating oil.
3. Brush downward, using steel wool, emery paper, or a wire brush.
4. Wipe away the rust residue with a soft brush or cloth.
5. Wash the blade in warm, soapy water and allow it to dry thoroughly.
6. Sharpen the blade (see above).
Tighten a loose wooden handle grip:
1. Remove the handle from the tool head (see above).
2. Remove excess or uneven wood from the end of the handle so that it will smoothly fit back into the tool head.
3. Spread epoxy adhesive in the tool hasp (where the handle fits).
4. Insert the wood handle and apply pressure or use a mallet to ensure a tight fit.
Top 5 To Try
· How to Replace Broken Garden Tool Handles
· How to Preserve Wooden Tool Handles
· How Do I Install Ames True Temper Replacement Handles?
How to Fix Garden Tool Handles
X

eHow Home & Garden Editor
Just because the handle has cracked doesn't mean you have to bid good-bye to your favorite rake, hoe or shovel. Substituting a new wooden handle for the old one is easy--and much less expensive than replacing a good tool.
Difficulty:
Moderately Easy
Instructions
Things You'll Need
- Replacement Wooden Handle
- Wood Rasp
- Punch
- Bench Vise
- Electric Drill
- Galvanized Wood Screw
- Hammer
- Screwdriver
- Smooth File
o 1
Take the broken tool to a hardware store or garden center and buy a replacement handle.
o 2
Clamp the tool blade in a bench vise.
o 3
Wriggle the handle out of the hasp or, if necessary, split the wood using an electric drill and pick out the pieces.
o 4
If the handle is fastened to the hasp by a rivet, file off the head. Then drive it through, using a hammer and punch.
o 5
For a wedged-in shovel handle, insert a punch through the hole at the bottom of the hasp and pound with a hammer.
o 6
Insert the new handle. (If necessary, file away some of the wood to make it fit.) Then, holding the tool by the working end, tap the handle on the ground until it slides into the hasp.
o 7
Drill through the rivet hole (if there is one) and into the new handle. Insert a galvanized wood screw that is slightly shorter than the diameter of the hasp.
Read more: How to Fix Garden Tool Handles | eHow.com http://www.ehow.com/how_118171_fix-garden-tool.html#ixzz1bipl1UkE
How to Treat Wood-Handled Tools

, eHow Contributor
updated March 31, 2011
·
·
·
Related Searches:
 Use penetrating oil to treat wooden handles.
Tools with wooden handles get abused. Rakes, shovels and garden tools are always exposed to the weather. Hammers, saws and woodworking hand tools get beat up. Wooden tool handles are rarely coated with any protective lacquer, and even if they are, it wears off and they dry out and crack. Penetrating oil is the best way to treat wooden handles. It penetrates into the pores of the wood and hardens, protecting the tool from the inside out.
Difficulty:
Easy
Instructions
Things You'll Need
- 100-grit sandpaper
- Cloth
- Linseed oil
o 1
Sand the handle by hand with 100-grit sandpaper. Form it into a cylinder and slide it along the length of the rake or shovel handle to remove all gray weathered wood or loose fibers. Swirl it around hammers and small tool handles, making them smooth.
o 2
Dip a cloth into the linseed oil and liberally apply it to the wooden handle until the handle will not absorb any more oil. Wait 15 minutes and wipe the oil off. Wait 24 hours.
o 3
Apply another coat of oil to the handle. Wipe off the excess oil but leave the handle looking wet.
o 4
Apply another coat of linseed oil every six months.
Tips & Warnings
· If you have splinters in the handle, break them off first and then sand the handle. If your handle is cracked or split. Inject glue into the crack. Put a hand clamp on it and wait 24 hours before you sand the handle.
· Boiled linseed oil dries faster, but adds no extra protection, use it if you desire.
· Although linseed oil is non-toxic, avoid breathing the fumes.
Read more: How to Treat Wood-Handled Tools | eHow.com http://www.ehow.com/how_8139309_treat-woodhandled-tools.html#ixzz1biqPmxHX
How to Care for Wood-Handled Shovels

, eHow Contributor
updated April 02, 2011
·
·
·
Related Searches:
 Clean and store your shovel after each use for longer life.
Many lawn and garden tools are built with wooden handles, including shovels. Wood is durable and strong, yet lighter and less expensive than steel. Gardeners may also prefer the aesthetic pleasure of working with tools manufactured partly from natural materials. Temperature extremes, rain and sun can all weaken and damage wooden handles. Proper storage and maintenance of your wood-handled shovel will keep the tool in good shape for years of reliable service.
Difficulty:
Moderately Easy
Instructions
Things You'll Need
- Garden hose
- Old rags
- Fine-grit sandpaper
- Linseed oil
- Clean cloth
o 1
Rinse the shovel blade with a garden hose after each use to remove dirt. Dry the blade with rags to prevent rust.
o 2
Store the shovel in an enclosed area, such as a basement, tool shed or garage to prevent weather damage.
o 3
Moisten a cloth with linseed oil and rub into the wooden handle if the shovel is exposed to sun and the handle begins to bleach. The oil seals and protects the wood.
o 4
Rub out minor nicks and burrs in the wood with fine-grit sandpaper to maintain a smooth grip on the handle.
Tips & Warnings
· Don't use the wood-handled shovel as a pry lever or crowbar to move heavy objects. The handle is not designed to sustain that kind of pressure and is more likely to break if exposed to the pressure
Read more: How to Care for Wood-Handled Shovels | eHow.com http://www.ehow.com/how_8155756_care-woodhandled-shovels.html#ixzz1biqgHdlm
How to Glue a Split Wood Handle
, eHow Contributor
updated March 31, 2011
Linseed oil is OK (that's what WWII GI's used in the field) but Boiled Linseed Oil works better. You wipe it on, let it sit for a while, and rub off.
One of the commercial Tung Oil finishes works even better. They are both open finishes so they don't trap moisture like varnish.
Carefully store oil, gasoline, or paint-soaked rags. Store them in a tightly sealed container in a cool, well-ventilated place away from other combustibles. Or, lay the rags out individually on a flat surface and leave them to dry completely before reusing.
Rags containing linseed, stain, paint and vegetable oil are subject to spontaneous combustion. Other natural oils such as mineral oil, cottonseed oil, cod and other fish oil present similar problems. Rags used with these products should be stored by submersing them in a water filled metal container with a fitted lid.
I know a fellow who burned down his house by leaving such rags on his deck.
There are a lot of commercial Tung Oil finishes, which are a blend of various solvents. Pure Tung Oil, like Linseed Oil, takes forever to dry.
Home Depot carries Minwax, which I've used and works fine. I use a foam brush and throw it away to apply it. To rub it down I use a towel and then lay the towel spread out outside on a rack.
Rust
If you continuously leave your tools out in wet weather or put garden tools away dirty, chances are they will develop rust. Once rust has formed on metal surfaces, it can be difficult to remove, but removing rust is essential if you want your tools to their retain their effectiveness.
1. Muscle Methods
o If you don't mind putting muscle into the project, getting rid of rust can be accomplished by some good old-fashioned scrubbing. There are several tools that will help with this method of rust removal. Sandpaper can scratch outer rust away, or you can use a drill with a sanding attachment, which will do much of the work for you. Belt sanders are useful for flat objects like spades and the backs of shovels. Other helpful tools include wire brushes to remove big chunks of rust and steel wool with WD-40 to scrape away smaller rust particles.
Kitchen Methods
o If you prefer less scrubbing, you can try one of the rust removal methods that involve standard kitchen supplies. Try 1 tbsp. of lemon juice with enough regular salt to create a thick paste. Dab the mixture onto the rusted area and rub with a dry cloth. The lemon and salt should cut through any surface rust. If you have steel tools, you can use a mixture of one part molasses to nine parts water. Fill a bucket or bowl with enough of the mixture to completely submerge the rusted steel. Let the tool sit in the mixture for two or three days and much of the rust will disappear. If the rust is thick, you can let the object stay in the molasses mixture for up to three or four weeks. Take the tool out every few days and wipe it down with a clean rag to remove the rust that has loosened and monitor the progress.
Naval Jelly
o Naval jelly is a substance made specifically for rust removal that works well on items with heavy rust. It is simply brushed onto the rusted surface, the rust dissolves and then the metal can be rinsed clean. More specific directions will be included on the jelly's packaging.
Prevent Future Rust
o Once the rust has been removed from a tool, try to prevent it from recurring. Tools should be hung, instead of being left to rest on surfaces that can become damp, such as shed or basement floors. Coating the metal with some type of wax is a simple way of preventing future rust. People use a variety of wax types, including butcher's wax and motor oil to keep their tools well-coated.
Read more: The Best Ways to Clean Rusty Tools | eHow.com http://www.ehow.com/way_5252172_ways-clean-rusty-tools.html#ixzz1bjZ2oeFi
Instructions
Things You'll Need
- Glass or ceramic bowl
- Old toothbrush
o 1
 Use a wide bowl to give the nails plenty of room. Photos.com/PhotoObjects.net/Getty Images
Drop the nail or nails into the bowl.
o 2
Pour Coke slowly over the nails to submerge them. Coke, especially if it's fresh, will bubble up and spill over the bowl if you pour too much.
o 3
Soak the nails in the Coke for 30 minutes.
o 4
Dump out the nails and Coke into a sink. Rinse the nails with water.
o 5
Inspect each nail. Scrub off any remaining rust with the toothbrush, and rinse with water.
o 6
Lay the nails out to dry before using or storing.
Read more: How to Clean a Rusty Nail With Coke | eHow.com http://www.ehow.com/how_8523120_clean-rusty-nail-coke.html#ixzz1bjZHPtsG
Get a 5 gallon bucket with a lid..throw all the tools in it and cover with paint thinner..leave em for a while and then fish em out..wipe with a rag and you are home free for the most part..
A little rust won't hurt ya much..really bad ones may have to be replaced but you are a whole lot ahead..
The Daily Fix: Remove Rust From Tools
Filed Under: Tools, Essential Skills, Know-How
Print this page|EmailShare on FacebookShare on TwitterShare on DiggShare on Lifestream

If you've ever neglected your tools then you know how easily they can rust.
When my husband and I got married, my father-in-law gave us some of his tools. A sturdy old box, filled with everything we could possibly need. The thing is, we didn't need them -- not for while, anyway. That box sat untouched for a few years. It wasn't until we bought a house that we found ourselves digging into that old neglected tool box. Needless to say, we were met with rusty wrenches, screwdrivers, and the like.
Luckily, bringing them back to life is easy.
Rust is iron oxide, a product of corrosion that results when iron is exposed to air and water. Acid forms on the surface of the wet metal, mixes with dirt and dust, and forms rust which then spreads.
If you've caught the problem early and the corrosion is still only confined tsurface spots, you should be able to scrub it away. Cover the rust spots with WD-40, and scrub it with sandpaper. If that doesn't do the job thoroughly enough, graduate to steel wool.
If a good scrub isn't enough, try this The Baking Soda Method:
Ingredients
Baking soda
Lemon juice
Directions
1. Mix the baking soda and lemon juice to make a thick paste.
2. Spread the paste over the rust spots and wait a few minutes.
3. Wipe it clean with a dry towel.
A similar paste can be made from salt and lemon juice. Another option is this Salt and Vinegar Solution, which is great for minor spot work:
Ingredients
White vinegar
Salt
Directions
1. Squirt lemon juice over the rust spots.
2. Pour salt directly onto the spots.
3. Scrub the spots with a brush.
4. Rinse with water and dry thoroughly.
Or how about the plain old Vinegar Method:
Ingredients
White vinegar
Directions
1. Soak your tools in undiluted vinegar. This will eat away at the rust, but it will potentially strip your tools as a result. Do not use vinegar on anything brass.
2. After you've soaked the rusty items, rinse and dry them.
3. If any small rust spots remain, you should be able to scrub them off.
If the rust is too tough for the above solutions, try The Molasses Method.

Ingredients
1 part Blackstrap molasses
9 parts water
Directions
1. Mix the molasses and water together in a bucket
2. Immerse the corroded tools
3. Let sit (heavily corroded tools will take as long as 3 weeks)
4. Remove the tools and wash them
5. Dry thoroughly
Commercial Solution
Most jobs don't need a commercial solution, but if DIY ones aren't cutting it, there is a selection of commercial products available for removing rust from tools. You'll find products like the popular (and environmentally friendly) Evapo-Rust at your local hardware store.
How to Prevent Rust
Once you've removed the rust, you'll want to take some preventative steps, making sure you don't have to deal with the same problem again and again. Here are some tips for keeping your tools rust-free:
1. Apply a light coat of WD-40 after each use. If you don't use the tools regularly, apply another light coating between uses.
2. Keep your tools clean and dry.
3. Place a few pieces of charcoal in your tool box to prohibit the accumulation of rust.
4. Combine old motor oil and sand in a bucket. After each use, stick the tool in this bucket. The oil and sand will protect the tool.
5. Read ToolSnob's review of the 3-in-1 No Rust Shield.
Real small tools like center punches ,I throw in the rock tumbler with some fish tank gravel.Itchy
NAVAL JELLY works well you can find it at most hardware stores.
Oh and if it is pitted use a very fine wet/dry sand paper to clean it up.
normally just lightly brush with a stainless wire brush and apply a rust converter, changes the rust to a black oxide type finish. You can get the rust converter from hardware stores or auto supplies. If you want 'em real pretty, you will have to polish them down to bare metal and spray 'em with a clear varnish to prevent further rust
If you have a number of tools to clean you could try electrolysis. It is a fairly simple process using Boraxo in water and running a low voltage current through the liquid. The tool is attached to one side of the circuit, and a piece of iron is attached to the other side of the circuit. Both are immersed in the water, with space between them, and the current carries the rust away from the tool and deposits it on the piece of iron. I believe the tool is attached to the negative side of the circuit. A car battery hooked up to a charger is a good source for your low voltage.
Evaporust. Works like a charm. Available at Lee Valley.
http://www.leevalley.com/wood/page.a...at=1,190,43040
You can also get it at Tractor Supply.
Linseed Oil - Its Uses and Limitations
Let the Natural Handyman give you the true "flax" about linseed oil!
| |
 Linseed oil, extracted from flax seed, is one of the most useful natural oils. It is used as a preservative for wood, concrete, and an ingredient in paints, varnishes, and stains. As if that wasn't enough, it is also used in soaps, inks, and in the production of linoleum! Note that the first three letters of linoleum are lin... for linseed! (graphic left of flax flowers courtesy Martin C. Michener, Ph.D., Faculty, Landscape Institute, Boston Architectural College).
But for home repair purposes (the reason you are probably reading this) the preservative qualities of linseed oil are our focus. Let's talk about this "stealth" product most people will never use alone, but we all depend on every day!
Linseed oil is a slow-drying liquid with good preservative properties and water resistance.
Before the advent of modern preservatives and synthetics, it was commonly used as a stand-alone preservative for wood, natural (hemp) rope, and masonry, as a conditioner for natural boar's hair paint brushes, and as an additive for oil paints. It was also valuable inside as a furniture finish and for wood floors.
It was found that the addition of solvents such as mineral spirits, japan drier, and turpentine would speed linseed oil's drying time, making it a more useful product. After all, what good is putting a preservative on your deck in the spring if you wouldn't be able to use it till the fall?
Which is the 'right' linseed oil for the job... Raw or Boiled?
 "Raw" linseed oil is just that... linseed oil mercilessly squeezed from flax seed (graphic left and above courtesy Martin C. Michener, Ph.D., both taken from his new e-book : Botany Everywhere, 4th edition.) and packaged with no additional additives or preservatives. Raw linseed oil dries very slowly, taking weeks to fully cure. You should limit its use to the insides of wood gutters, chopping blocks, sawhorses, and other items exposed to the elements where drying time is not a consideration.
Slow drying is a mixed blessing. For oil-based paints, slow drying is a benefit, since this allows the paint to "level" itself, giving a smoother finish with fewer brush marks. The best looking paint jobs are invariably oil paint jobs, without question. However, when used as a wood preservative for items that are handled or walked on, such as tool handles, furniture, or wood decks, long drying times are undesirable.
Enter boiled linseed oil...
"Boiled" linseed oil is not boiled. The actual boiling of some oils changes their drying characteristics, true. With linseed oil, though, it is the addition of certain solvents that causes linseed oil to dry more quickly, acting as if it were boiled. This makes it a better product for preserving tool handles, decks, and furniture. I suppose they should have named it "sort-of-boiled linseed oil", or "kinda-like-boiled-but-not-really-boiled linseed oil". You know... to make it less confusing. Uh huh.
Is linseed oil useful for the homeowner?
Despite the claims of linseed oil manufacturers and salesmen, there is a commercial wood preservative that exceeds linseed oil's performance for almost every application. Perhaps the only reason to consider using linseed oil as a preservative is the price. Linseed oil is less than half the price of a commercial preservative. If I was going to coat a half mile of wood fencing or other non-critical application, I just might choose linseed oil.
There are only two uses for linseed oil for which there is no reasonable alternative. Both involve glazing.
- As an additive to glazing putty... If your oil-based glazing putty is getting a little stiff, or if the new can you just bought seems too dry (and the store is a half-hour away), add a very small amount of boiled linseed oil and mix thoroughly. If the putty is dried and lumpy, you will not be able to totally restore it by adding linseed oil... it will still retain some lumps no matter how long you mix. But don't use the Cuisinart... yes, I know it crossed your mind!
- Dry wood in window sash when reglazing... When replacing a window pane, brush or rub some boiled linseed oil on the sash before applying the new putty. Wipe off any excess. You can apply glazing putty immediately. This will prevent the wood from drawing the oil from the putty too quickly, causing an overly dry contact point with the wood and possible premature failure of the putty. Though you might think that adding extra linseed oil to the putty would give the same result, putty that is too soft will be very sloppy to work with and difficult to smooth. (Excessive softness is one of the drawbacks of the current crop of latex-based glazing compounds.)
Why shouldn't you pick linseed oil as your first choice in a preservative?
Linseed oil has some negatives. Granted, it has been used with some success for many years. But welcome to the modern world! Today, there are scads of linseed oil-based paints and preservatives that expand on linseed oil's good qualities while overcoming (at least to some degree) its drawbacks.
Some of the problems with straight linseed oil, boiled or raw, are:
- Sometimes linseed oil can take forever to dry... or stays sticky or doesn't dry at all!! This is a nightmare situation that happens too often when linseed oil is applied either (1) too thickly, (2) onto damp materials or (3) when the temperature is too cold. Thinning linseed oil with turpentine can help somewhat, but even with thinning it is important to apply thin, multiple coats but allow each coat to dry before applying the next!
- No UV (ultraviolet) light resistance... UV causes more damage to exposed wood than any other factor, destroying wood fibers and setting it up for attack by mildew, fungus, and insects.
- Linseed oil is mildew food... Many vegetable oils are food products for humans... all vegetable oils are food products for mildew! Linseed oil is not completely denatured, so it can encourage rather than discourage mildew growth.
- Linseed oil does not harden sufficiently to offer enough resistance to abrasion to be a suitable deck floor preservative... at least by today's standards. Linseed oil has been used for interior wood floors, but it must be waxed for durability! Waxing an outside deck would be dangerous, even if you hang a "Slippery When Wet" sign!
- Difficult to remove from wood... Multiple coats of linseed oil are gummy and difficult to remove fully for refinishing.
Is linseed oil a "green" alternative to typical wood preservative products?
I have received many inquiries from people who are interested in using "environmentally friendly" products to seal their decks, and want to use linseed oil instead of branded products. Raw linseed oil does not, to my knowledge, contain any dangerous chemicals. However, any specific brand may or may not be suitable for food surfaces such as cutting boards, wood bowls, etc. (There are other drawbacks, as mentioned above, to using raw linseed oil.)
Then, there are those dang additives. Let me quote the warning label from a typical hardware-store can of boiled linseed oil I read the other day...
"Use of this product will expose you to arsenic, beryllium, chromium, cadmium and nickel, which are known to cause cancer; and lead which is known to cause birth defects and other reproductive harm."
These metals are used in conjunction with solvents to improve the drying time of linseed oil... the "boiled" linseed oil I mentioned earlier in this article. Typical hardware store boiled linseed oil, unlike the linseed oil available in health food stores as an omega-3 supplement, is not suitable for human consumption. Does this make it "unnatural" or not "green"? It depends on your point of view. I see no reason not to use this on a fence, but I wouldn't coat a child's playpen or wooden eating surfaces with it!
A more natural alternative is heat-treated linseed oil. Is it better? Because heat-treatment is more expensive than adding chemicals, expect the cost to be greater but it's questionable whether heat-treated linseed oil performs better. So is it worth the extra money? It again depends on your point of view.
By the time you add a mildewcide... well, you get the picture. So much for all linseed oil being environmentally friendly. Face it... sometimes the most environmentally unfriendly person around is Mother Nature.
I have found one company that offers a linseed oil-based product that is purportedly food safe, as well as a few furniture-finish quality products. (I'm sure a web search would find more.) None of these are 100% linseed oil, but have additives to improve the product:
Alright, so you can't eat it. But what about spontaneous combustion?
You know, like in the Sci-Fi movies when people suddenly burst into flames. Linseed oil dries through oxidation, and the process releases heat. The faster the oxidation, the more the greater the heat. A pile of rags or paper towels soaked with linseed oil can actually start burning without warning, leading to the manufacturer's warning that all oil-soaked rags should be stored under water in a covered, metal container, or washed before storage or disposal.
I confess that I have never had a pile of linseed soaked rags ignite, but I have received a number of reader comments that indicate that the problem is real and dangerous. Click here for my article on Spontaneous Combustion with reader comments.
A final note about "natural" products...
You would be amazed at the amount of negative and even downright nasty correspondence I've received about this article. The main sources are companies who sell so-called purified or "natural" linseed oil. They claim their products resist mildew, have none of the toxic chemicals I cited above, and dry quickly. I cannot verify or deny their claims since I have not tested their products. However, I can tell you definitively that without a mildewcide additive any exterior application of linseed oil will mildew, provided the conditions for mildew growth are present... warm, moist, dimly lit... you know, like in a bathroom!
Of course, I shouldn't have to remind you that this is a home repair website, not a nutritional, artistic or antique restoration website. Our concern is with practical, around-the-home uses. These other applications use linseed oil in unique ways that differ both practically and aesthetically from simply treating a mile of raw wooden fence.
Though I risk sounding like a broken record... errrr... scratched CD, I must restate that commercial sealants (some of which contain linseed or other drying oils) outperform "natural" linseed oil. And since these products tend to be relatively pricey, the buyer must weight cost against durability and long useful life. Let the buyer beware! (For me, I always choose the most durable and reliable, cost be damned!)
As the "Natural" Handyman, I've often been mislabeled to be a proponent of natural solutions to home repair problems. Wrong. I am a proud proponent of the best solution(s). Sometimes, the best solutions aren't totally natural, at least as has been defined by the "mankind is unnatural" crowd. The fact is that most products with solvents become safe when dry as the solvents have evaporated. As long as care is taken to provide ventilation during the drying phase, health and safety concerns are minimized.
Make Your Own
Planet Whizbang Handle Rub
(A Remarkable Wood Preservative)
.
Wood tool handles should be maintained with an annual coating of suitable wood preservative. For many years I’ve used boiled linseed oil for this purpose. It does the job. But a friend of mine (the fellow who makes the Planet Whizbang handles I sell) told me about a much better handle “rub.” This essay will tell and show you how to easily make this remarkable tool handle coating. If you make some of this rub for yourself, you’re going to be very pleased with it.
I want to make it clear that this homemade paste can be applied to any wood handle: hoes, shovels, rakes, forks, picks, and even scythe snaths are tools that will last long and serve you better if they’re given a periodical rub with this mixture.
Personally, I’ve even used it as a waterproofer and preservative on my leather work boots. I can’t say that this is a recommended use of the rub. But it seems to do the job just fine.
There are three simple ingredients in this “Whizbang” handle rub: boiled linseed oil, turpentine, and wax. The wax can be bee’s wax or paraffin (otherwise known as candle wax). You combine these three ingredients and heat them to get them thoroughly blended. When the mixture cools, you have a soft paste.
Since linseed oil and turpentine are flammable, Do NOT Make This Mixture Indoors. Keep the process outdoors where, if something goes wrong, you aren’t going to cause a structure fire. And please understand that when you heat up flammable materials, there is always the possibility that you can be burned by flame or hot ingredients. So use extreme care. Do not make this rub if you are not going to take full responsibility for your actions. Nuff said. Let’s begin....
This next picture shows the ingredients and tools I recently used to make a pint of handle rub. A pint will coat a lot of handle area.
From back to front, there is a propane torch, turpentine, boiled linseed oil, two old candles, a stirring stick, Vise-Grip pliers, empty tin can, and one pint jelly jar.
I began by pouring some linseed oil into the pint jelly jar. The ingredient proportions are 1/3 boiled linseed oil, 1/3 turpentine, and 1/3 wax. But these proportions are not exact. Approximations are close enough.
Next I added some turpentine to the jar. I happen to love the smell of turpentine. It takes me back to when I was a little boy. The boat house at my grandparent’s camp in northern Maine smelled of turpentine.
Then I pour the mixture into the tin can for heating.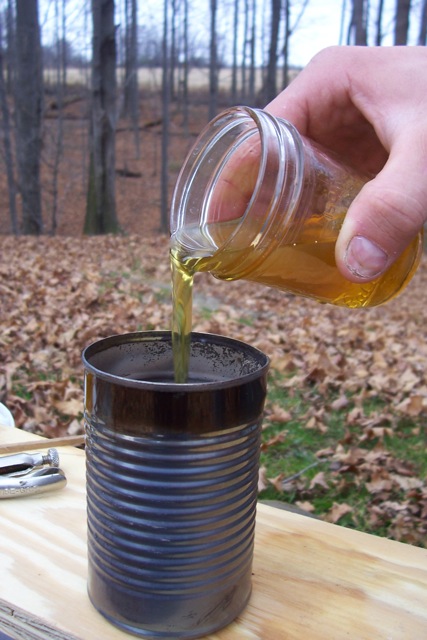
For the wax in this handle rub mixture, I used a couple of old candles. When I see candles at a yard sale for 5-cents or 10-cents (or even 20-cents) each, I buy them. I buy them because I think I might need them someday when the electricity goes out. It’s always good to have a supply of candles on hand. Besides that, you can use them to make a dandy wood tool handle rub.
You can break up the candles and put them in the can, or just stick the whole candle in. It will melt down quickly when you get the linseed oil and turpentine real hot. The Vise-Grip pliers make a perfect handle.
I should point out here that I’ve also used beeswax to make this rub. I happen to like bee’s wax rub better, but beeswax is a whole lot more expensive than some old candles, and the candle wax works just fine.
[Note: when made with beeswax, this rub makes a very fine finish for homemade furniture—like, for example, on Yeoman Furniture]
I used a propane torch to heat the can up, as shown in this next picture.
Keep the heat on the bottom of the can and get it roiling hot. When that happens, the candles will melt right down to nothing. It will take maybe 5 minutes for this to happen.
That is HOT oil. Don’t spill it on yourself. I used a small stirring stick to fish the candle wicks out.
Then pour the solution from the can into the jar. You could actually leave it in the can if you wanted.
I was concerned that pouring the super-hot solution into the canning jar might shock and break it. So I poured only a little in at first, and let it heat the jar up before filling it the rest of the way.
The mix will solidify into a firm paste when it cools down.
To use your homemade tool rub
Dip a cloth into the paste and rub it liberally on your tool handles (before you do that, though, you might want to take a minute to smooth and clean the handle with a piece of 100-grit sandpaper). The wax will fill and seal small cracks in the wood. Leave the rub on the handle for a few minutes, then buff it with another cloth. It’ll rub down to a smooth, waxy sheen that is durable and feels particularly good in the hand.
Herrick Kimball![]()
·
·
·
Related Searches:
 Repair old wooden handles with glue and clamps.
Wood handles on items such as rakes, shovels, gardening utensils or even hammers take a real beating. Over time they invariably split. But you don't need to discard them. You can repair a split handle with wood glue and clamps. Modern wood glue is strong enough to permanently repair almost any split. Glue seams are actually stronger than the wood itself and once you glue a seam, it won't ever come apart in the same place again.
Difficulty:
Easy
Instructions
Things You'll Need
- Putty knife
- Glue in glue bottle
- Woodworker's hand clamps
- Damp cloth
- Sandpaper, 80 grit
- Cloth
- Linseed oil
o 1
Insert the tip of a putty knife into the split handle. Force it down as far as it will go. If it penetrates through the other side, that's fine.
o 2
Pry sideways on the handle of the putty knife to open the split. Insert the tip of a glue bottle into the split as far as you can and squeeze the bottle to inject glue along the length of the split.
o 3
Slide the putty knife up and down inside the split as far as you can to smear the glue. Add more glue if needed to completely saturate the crack with glue.
o 4
Place clamps on opposing sides of the split, 2 inches apart, along the length of the split. Tighten the clamps until glue oozes out the length of the split. Wipe off the wet glue with a damp cloth. Wait 24 hours for the glue to dry.
o 5
Remove the clamps. Wrap the handle with 80 grit sandpaper and slide it up and down until all the residual glue is gone and the handle is smooth. Wipe the handle down with a cloth saturated in linseed oil.
Tips & Warnings
· Apply linseed oil every six months to keep the handle looking like new.
· Old wood can be very brittle until you treat it with oil. Be careful of splinters.
· Don't use nails or wire to fix a handle. It won't work and you'll run the risk of breaking it in your hands.
Tool Handle Restoration
1 of 3
Ken's garden tool collection.
Your garden tools can look as good as these!

« Previous Photo
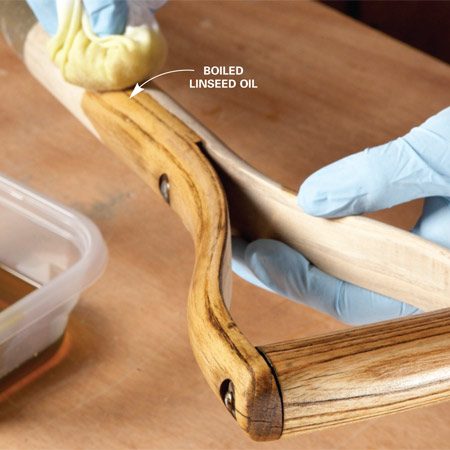
Here’s a tip sent in by Ken Werner, one of our field editors: “Each spring I sand our gardening tool handles with 120-grit sandpaper and then rub a coat of boiled linseed oil on them. The handles stay smooth throughout the gardening season. Then I do it again before putting the tools away in the fall.” The tools look terrific, and the smooth oiled surface resists cracking and is much easier on the hands. If you’re more like Oscar than Felix and your tool handles have never been sanded, they’re probably as rough and worn as ours were. In that case, use a random orbital sander (Photo 1). You’ll still have to hand-sand the spots you can’t reach with the sander, but it’ll save you a lot of effort.
· 
· 
1
We Also Love


1 of 2
Find More
· Home maintenance and repairs ideas
·
Rate
0
· Comments(0)
Martha Stewart Living, Volume 53 October 1997
While you wouldn't forget to wash your hands after working in the garden or to brush your teeth before heading to bed, you might not realize that your garden tools need the same daily care. Before long, the tools begin to deteriorate -- but so gradually that you may not notice until it's too late. Caring for tools is far easier than working with dull or rusted ones and cheaper than buying new ones every few years.
Well-maintained tools make every task more agreeable. Sharp garden shears will trim grass with ease, and a well-honed shovel will slice through soil efficiently. The garden benefits from your efforts, too: A keen blade on a pruner, lopper, or lawn mower cuts cleanly, allowing plants to heal more quickly.
Taking care of tools also makes sense economically. Tools seldom become obsolete; most will be as efficient and reliable decades from now as they are today. And some become more valuable over time as collectible antiques or practical family heirlooms. Just ask Martha: she uses several tools inherited from her father to help keep her gardens beautiful. So take a few minutes at the end of each day to wipe off dirt and moisture, and a couple of hours every few months to sharpen dulled edges, grease creaky hinges, and replace missing parts. Set aside a corner of your garage, toolshed, or basement as a tune-up area -- because once you're organized, keeping tools in pristine condition will become an easy habit.
The Martha Stewart Show, January 2007
Cold winter and early spring months are the perfect time to start getting your gardening tools and pots ready for the season to come. Follow these tips for keeping your tools and pots in great shape.
Sharpening Tools
Sharp tools are of course more effective, but also safer and easier to use. Tools that should be sharpened include hoes, shears, scissors, knives, loppers, pruners, and shovels.
To sharpen the edges, put a bit of oil -- either WD-40 or motor oil -- on the blade. Then, with a handheld whet stone, file the blade at a 20-degree angle. You can also use a file or a motorized sharpener depending on the tool needing sharpening and the equipment that you have.
If the blade edge is beyond repair, it's time to purchase a new one.
Sterilizing Pots
Pots used for planting should be free of mold and fungus so that plants can start off in a healthy base. To clean plants, scrub pots with a pot-scrubbing brush, and then soak in 10 percent bleach solution for 10 minutes. This simple sanitizing solution kills bacteria, viruses, fungi, and insects on pots. Leave them out to dry completely before stacking for storage or using to plant.
Routine Care
The best way to keep all of your tools in great shape is to take care of them year-round. To keep them pristine, do the following after each use:
1. Tap tools to remove clumps of soil.
2. Remove soil from blades and hinges with a clean cloth and brush.
3. Always use a proper cleaner to remove sap from tools after use.
4. Clean metal tools by plunging in a bucket of oiled sand. To make oiled sand, pour 3/4 quart motor oil or mineral oil into a 5-gallon bucket of sand (the sand should be damp but not moist). Push blades of tools into sand. This helps clean and condition the metal.
5. Store tools in the oiled sand, or hang on pegs.
6. Establish a regular schedule of maintenance. Once a month, you should sharpen blades, oil springs, and replace failing parts.
7. Create an area for tool storage and maintenance -- once you're organized, keeping tools in pristine condition will become an easy habit.
More Gardening Links
Maintaining Shovels
Sharpening Scissors and Shears
Sharpening Pruners and Loppers
Sharpening Hoes, Shovels, and Edgers
Cleaning Terra-Cotta Pots
Tool Care 101
Resources
All of the gardening tools featured in this segment are Martha Stewart Everyday products and can be found at Kmart.
· 
· 
1
·
Rate
0
· Comments(2)
Martha Stewart Living Television
In addition to providing a better grip, coating garden-tool handles with rubber protects them from wear and tear, seals out water to prevent corrosion, and adds an attractive bit of color, making them easily identifiable. Simply dip a plastic, metal, or wood-handled trowel, cultivator, or pair of pruners (short-handled tools work best) into a can of rubber coating so that the liquid rubber completely covers the handle. Remove the tool slowly, allowing the excess coating to drip off while rotating the tool. Hang the rubberized tool on a rack, or stand it in a bucket of sand to dry for 4 hours. If necessary, repeat the process to create a second coating. This technique also works well for household tools such as wrenches, screwdrivers, and pliers.
· 
·
1
Find More
·
Rate
0
· Comments(0)
Martha Stewart Living Television
Sometimes the handle of a favorite tool becomes worn and too smooth, or cracked with age, making it difficult to maintain a solid grip -- especially while wearing gardening gloves. You can easily improve your traction by wrapping handles tightly with sports tape (the kind used on hockey and lacrosse sticks and available at sporting-goods stores). That way, you can hang onto your tools longer and tighter.
· 
· 
1
Find More
·
Rate
6110022
· Comments(1)
Martha Stewart Living, Volume 53 October 1997
Take a few minutes at the end of each day to wipe off dirt and moisture from tools, and you'll be rewarded with tools that make gardening tasks a pleasure. Solvents such as lighter fluid and Liquid Wrench are good for tough cleanup jobs. After pruning conifers and woody shrubs, squirt solvent on a rag, and wipe the sticky sap from the pruner's blades.
To remove rust from long-neglected tools -- like a vintage bulb planter -- cut a scouring pad into manageable pieces, then dampen a piece with solvent and use it to scrub away the rust. When finished, wipe the tool clean. Solvents also help loosen rusted screws and quiet creaky joints. Since many solvents are poisonous, store them securely out of reach of children and pets.
posted by sam at 2:53 PM
0 comments
![]()
![]()


